by David and Philip
The COCO dataset is a popular dataset to train general object detectors and is often used as a benchmark to compare these detectors as well. The 2017 COCO dataset consists of 118,000 and 5,000 labelled images separated into training and validation sets respectively. The object labels are organized into 80 object classes and into different supercategories such as outdoor, vehicle, and food. Despite the range and variety of object classes, having only 80 object classes can be quite limiting. We, therefore, modified this dataset and extended its functionality by relabelling some of its objects.
We have taken the COCO dataset and refined the class traffic light into three separate object classes: traffic_light_red, traffic_light_green, and traffic_light_na. These new classes allow for a model to determine the state of a traffic light to determine whether a car can safely pass through an intersection.
While relabelling the traffic light annotations, we have found some inconsistencies and mistakes in the original labels, some of which we present here. We have either corrected such mistakes or excluded the annotations from the dataset by keeping their label as traffic light.
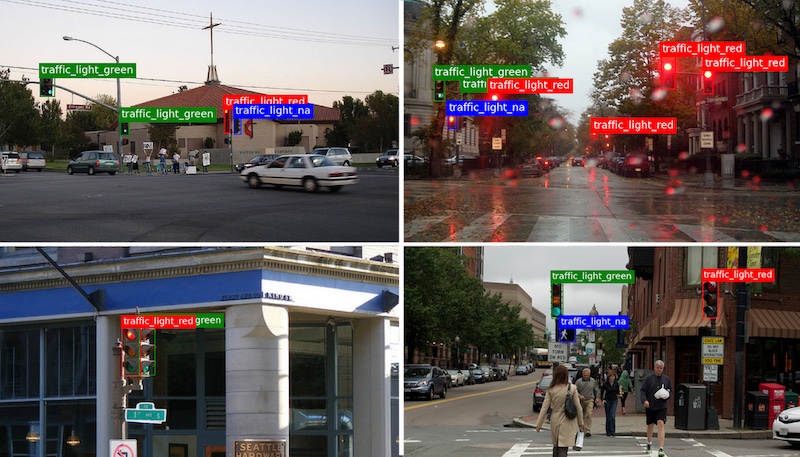
In a dataset, the number of annotations for each object class should be similar to each other, so that a detector can learn to separate them sufficiently well. Consequently, by subsampling the traffic lights, we have effectively reduced the number of annotations per new class by about 1/3, leading to an overall class imbalance. To compensate for this we have annotated and added more images of traffic lights from the LISA Traffic Lights dataset to one of our datasets.
We have generated three datasets from our adjustments. These are available in COCO-style annotation files along with the code with which they were generated. You can find these annotations along with instructions on how to set them up in this repository.
In the rest of the post, we are going to present the label policy which we used to label the traffic lights first. Afterwards, we present the three dataset variations in detail. Finally, we show how you can access and contribute to them.
Label PolicyPermalink
When curating a dataset, it is important to ensure that the images are labelled accurately. We believe that one large factor for poor label quality is a lack of clear and consistent label instructions. For example, one data labeller may decide that an RV should be labelled as a truck while another may label it as a car. Within our own labelling task, we had to decide on whether right and left arrow turning lights should be considered red, green, or na.
Developing such clear instructions can be difficult, especially for such a diverse set of images. In our case, we have traffic light images from all over the world, but we look at them with a North American/European bias. After going through some images we decided to use a label policy based on two criteria: geometry and indication.
Geometry
- Each traffic light has to be labelled individually as one unit.
- Green and red indicator lights are of circular shape or arrows. Otherwise they will be labelled as ‘na’
- Vertically stacked lights: red on top, green at the bottom, optional amber.
- Horizontally aligned lights: Go by colour only.
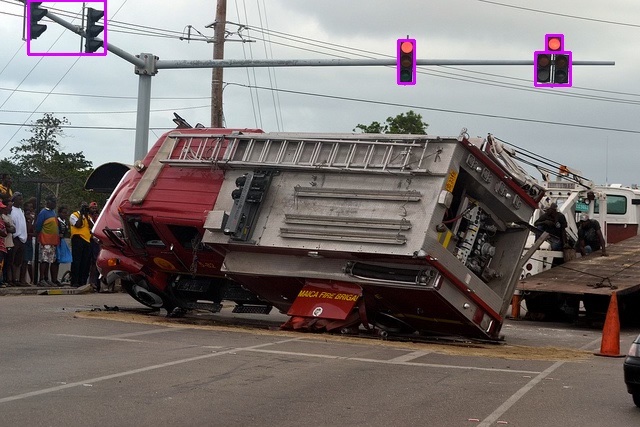
Figure 2 shows examples of correct and false labels based on our geometry criteria. Note that with criteria 2, we eliminate most pedestrian lights you find in North America and Europe such as traffic lights in the shape of cyclists.
Indication
In addition to the geometry, we defined the colours as well as the indicated directions in the case of arrows.
-
Traffic lights red -> red
-
Traffic lights green -> green
-
Traffic lights amber -> na
-
Traffic light arrow straight -> red or green
-
Traffic light arrow left -> na
-
Traffic light arrow right -> red or green
-
Light on railway crossing -> red, na
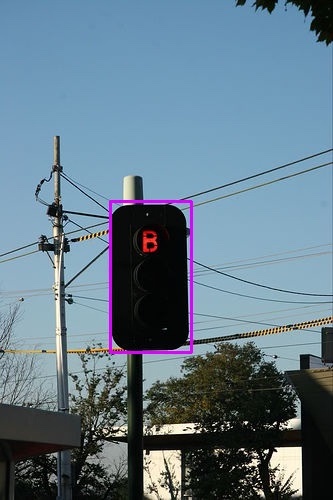
Figure 3 shows why we need both of these categories. Here, a light is shown with correct outer geometry and colour. But the indication is a letter B instead of a circle or arrow. Consequently, according to our label policy the label should be na. We suspect this is an indicator for a bus.
The DatasetsPermalink
Next we describe the three datasets in more detail. They are available through this repository.
Dataset 1 - COCO RefinedPermalink
This dataset is based on the full COCO 2017 dataset, both train and validation sets, with all 13,521 traffic light annotations in 4,330 images refined into the three classes: red, green, and na. False traffic light annotations keep their class label as 10, so they can be easily filtered out if desired. Note that this dataset does not include any images from the LISA dataset.

Figure 4 shows all annotations for each of the traffic light classes. As you can see the traffic light annotations are skewed towards traffic_light_na.
We suspect two main reasons for the overrepresentation of the na class. Firstly, the dataset is scraped from the internet. Consequently, a lot of images were not taken with the traffic lights from a driver’s perspective in mind, where you would expect the labels red or green. Instead it seems that the traffic lights are often a byproduct of portraits of people or buildings for example, where the traffic lights appear in the background. This leads to a large number of pedestrian lights for example, since an intersection is viewed from the side of the street. As a side note, another consequence of this is that people prefer taking pictures when the weather is nice, so pictures of traffic lights in dark, rainy, snowy or foggy conditions are quite rare.
Secondly, our label policy is quite restrictive in terms of red and green lights. Arrows which point to the left, or indicators for trains for example are considered na.
A second big group with almost 10 are mislabelled lights. We have another blog post dedicated to these. Besides very obvious mistakes this could also be explained by our strict label policy, which for example does not allow for labelling two lights with one box.
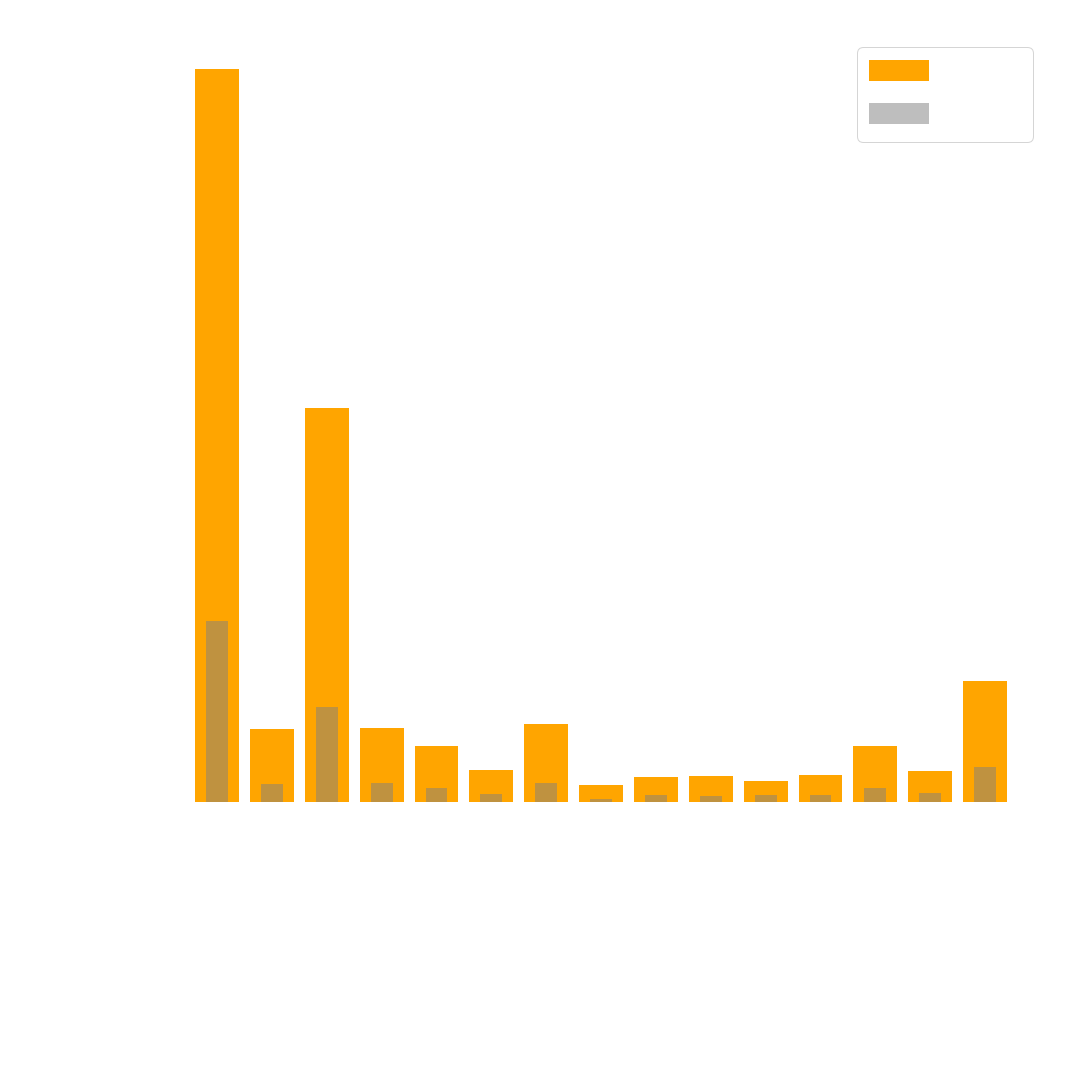
A third thing to note is that generally where you have traffic lights, you also have vehicles and pedestrians. Vehicles and pedestrians are often in the same image as traffic lights since the purpose of a traffic light is to regulate traffic. This makes it difficult to maintain an object class balance, as you can see in figure 5.
Dataset 2 - COCO TrafficPermalink
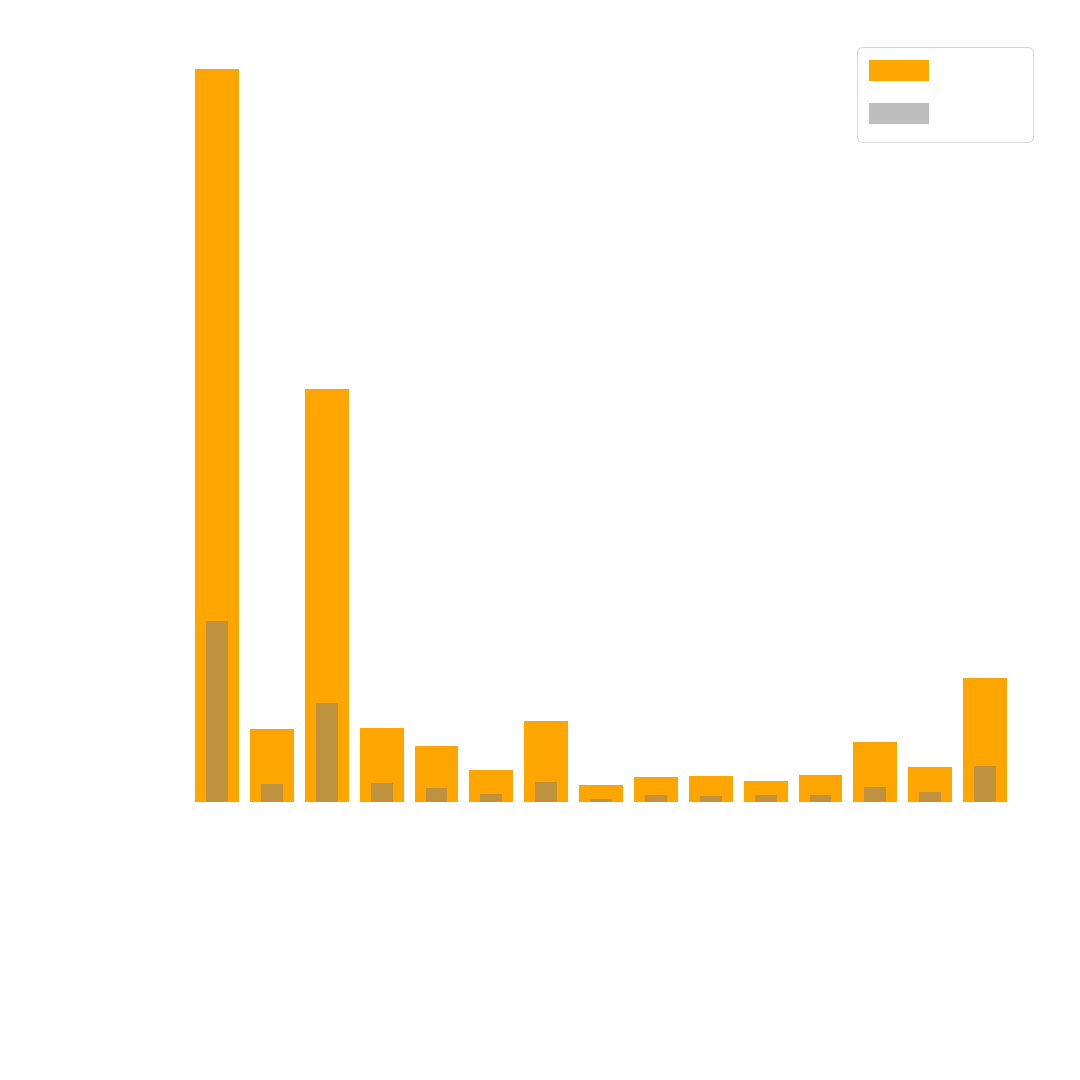
This is a smaller subsample of Dataset 1 with a total of 15 classes related to traffic scenes, see figure 5. This set was sampled from the train2017 dataset first for 12 classes. In a second step we added all relabelled traffic lights from the dataset COCO Refined, which added 3 classes. From this resulting dataset, we then sampled 20 of it to create a validation set.
Dataset 3 - COCO Traffic ExtendedPermalink
For this dataset, we extended COCO Traffic (Dataset 2) with more images of traffic lights. We wanted to get more images that are from a driver’s perspective and focus on the classes red and green. Hence, we used the LISA Traffic Lights dataset which consists of driving clips in Palo Alto. We found this is a great extension since there are a lot of images available where the car is sitting in traffic at an intersection. That means the traffic lights are viewed in both red and green states, and from different angles since the car eventually drives through the intersection. Additionally, images taken during the day and at night are available.
A downside of this dataset is that the variation of scenes is limited, since there are only a few intersections recorded. Thus, we included 491 annotations (in 168 images) of traffic lights. Since most scenes are busy intersections there are also many cars for example, which is why the total number of additional annotations is 1915.
We pre-labelled these images with a COCO-trained DETR model and refined the resulting labels with the tool makesense.ai.
Figure 6 shows you the total amount of annotations in this dataset.
How to access the datasetsPermalink
The modified COCO annotation files are available here:
If you want to know how to set up the datasets, see this repository where we provide detailed instructions as well as tools which we used. Note that you need at least 20GB of storage on your machine for the setup, even if you don’t want to use the full COCO dataset.
The repository is also the place for you if you want to further refine the dataset, or add more images of traffic lights.
