
Making an object detection app in Swift
Coming soon: Updated app code with SwiftUI, hosted UIKit, and clean(er) code.
Nowadays almost everyone carries a portable computer and camera in their pocket via their phones. Technology has advanced far enough that phones now have enough processing power to connect to the internet, play games, and watch videos. It is now possible to even run some of the latest neural network models on a phone, so I wanted to observe how well object detection works on an iPhone. After developing the user interface in Swift, I had to find a way to integrate my PyTorch model. As a side note, the app is the first time I worked with Swift, so if there are any obvious mistakes or inefficiencies please let me know.
Currently I am aware of two ways to integrate a model trained in Python. The first one uses ObjectiveC++ on the iOS side which interfaces with libtorch’s C++ api. There is a tutorial available for this solution. However, I find interfacing the model here quite complicated which is why I decided for a second approach. This approach is to convert the model into the Core ML format. It can then be used directly by the Vision framework in Swift to be used in an iOS app.
To get started with object detection in iOS, Apple provides an example. Unfortunately, it might take more than just swapping out the model file to make a detector work. There are some transformations required to display a live view with bounding boxes properly which are the focus of this post.
This post focuses on sending frames to the model and processing detections only. For details on how to read and display frames from the camera or how to build user interfaces, please see other tutorials. Also, to keep the post readable, I extracted the relevant sections from the code only and omitted less relevant parts in understanding the code structure such as try catch statements. To see the full working code check out the repository.
Overall structure
The app uses SwiftUI for most of its interface on top of Storyboard and is organized into three folders:
DriverAssistant/
├── Views/
├── Models/
│   ├── yolov5sTraffic.mlmodel
│   ├── ...
├── ViewControllers/
│   ├── ViewController.swift
│   ├── ViewControllerDetection.swift
│   ├── ...
├── ...
For detecting and visualizing results in real time, only three files are relevant. The ViewController.swift implements the class ViewController which both defines the app’s root view and reads and displays a live feed from the phone’s back camera. The object detection model yolov5sTraffic.mlmodel is handled in a separate class which is implemented in the file ViewControllerDetection.swift. Figure 1 shows how these classes and the model are related.
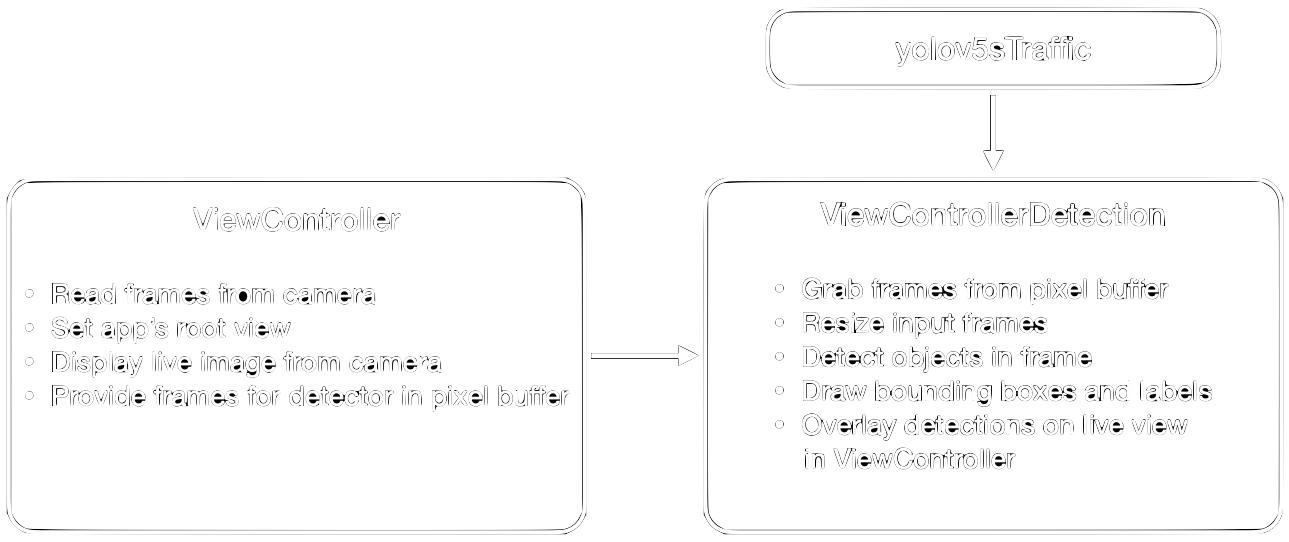
The rest of this post is organized in two sections which each explain the steps listed in figure 1. First, we will see how we read and display frames from the camera with the ViewController. Afterwards, we look at the ViewControllerDetection where we make predictions with the model, and how we have to project these predictions into the live preview with transformations to display the bounding boxes and labels correctly.
ViewController: Root view, get and show frames
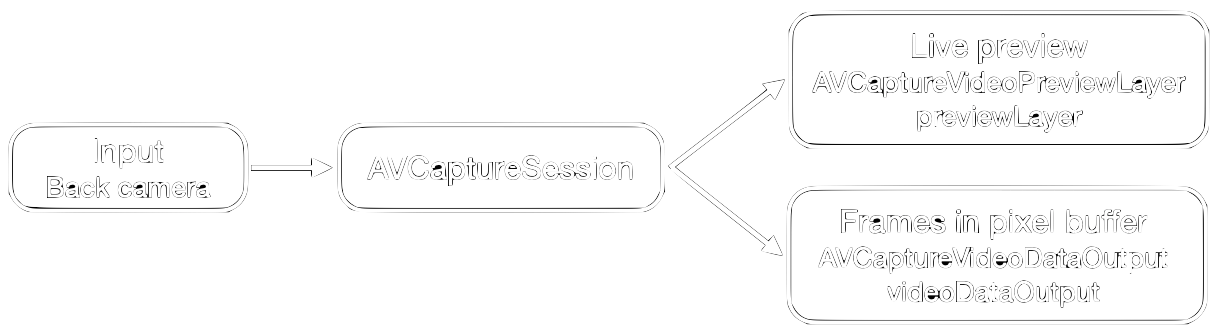
The goal of the class ViewController is to provide both a live camera preview to be displayed to the user, and to store frames in raw pixel values in a pixel buffer from which the model can grab frames, see figure 2. For reading and displaying frames, we use an AVCaptureSession object with two outputs: an AVCaptureVideoPreviewLayer object named previewLayer and the pixel buffer named videoDataOutput. The focus of this post is the second output so we will only briefly discuss how to read from the camera and display the preview.
Views and Layers
Before we get started, a quick review of the difference between views and layers in Swift. A view is backed by a layer which you can access through the property .layer. Layers are used for drawing or animation. You can place multiple layers on top of each other in one view. More details on this topic can be found here.
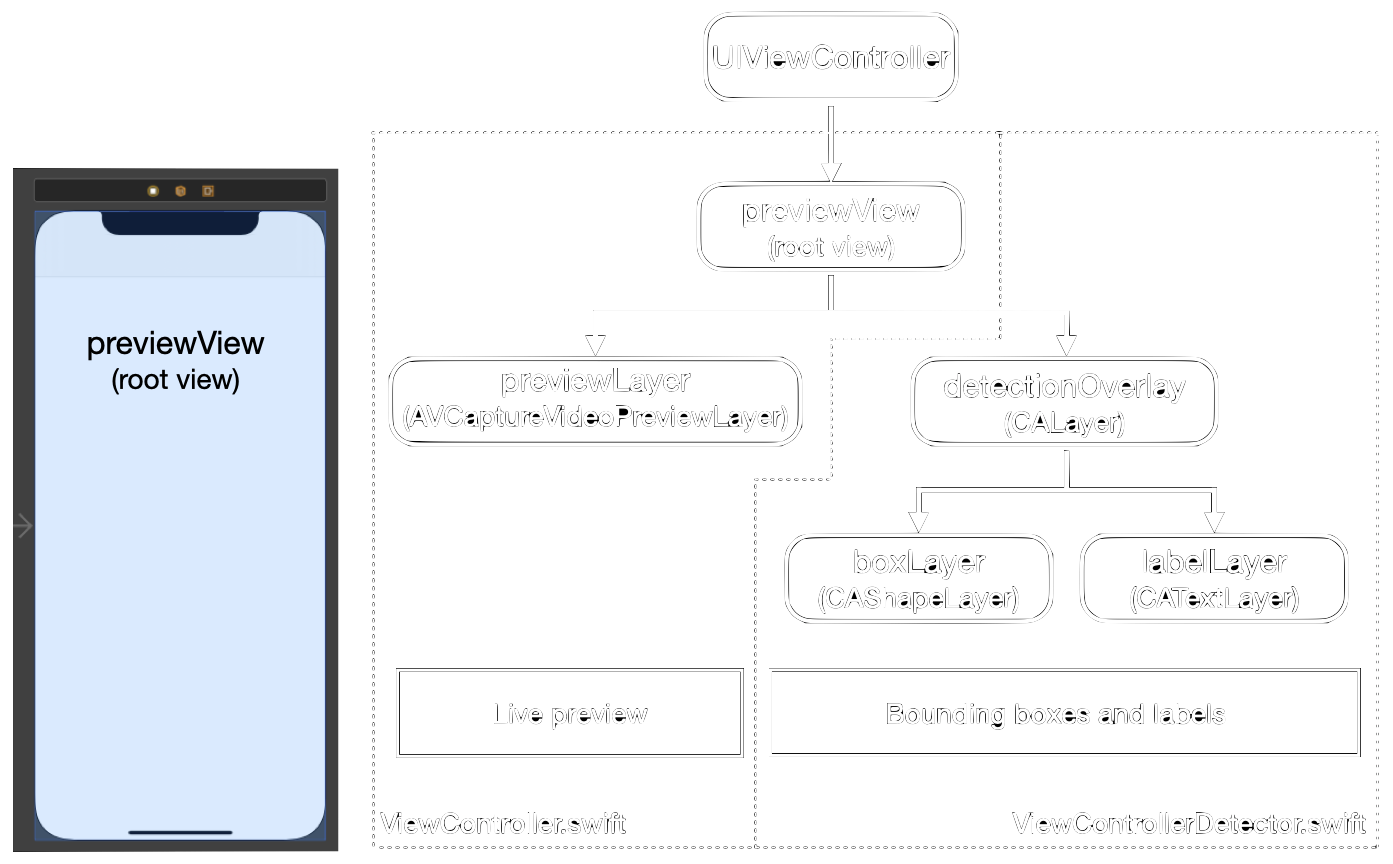
In figure 3, you can see the structure of views and layers in our app. We place the root view previewView on our phone screen in Storyboard (left) and add layers for the different functions to it.
First output: Preview layer
We implemented the live preview by setting up an AVCaptureSession and defining the previewLayer which we place on the previewView, see figure 3. To do this, we accessed the root view’s layer property and assigned it to the layer rootLayer.
var rootLayer: CALayer! = nil // Set up empty layer
rootLayer = previewView.layer // Assign the previewView’s layer to rootLayer
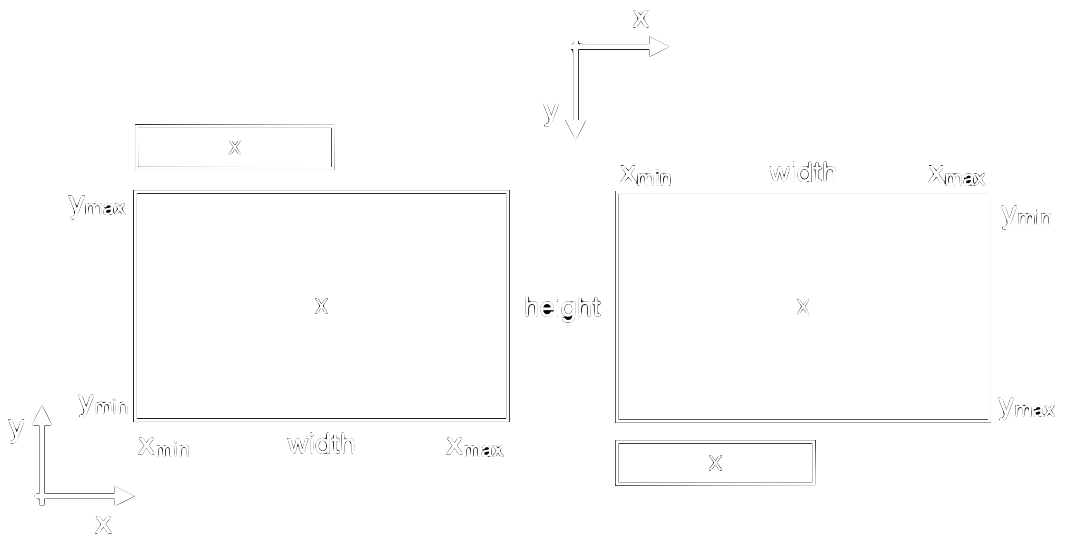
We set the size of the previewLayer to be equal to the size of the rootLayer, which is 390x844, and add it to the rootLayer.
Additionally, we read in the height and width of the selected camera input. We need these later when we transform the scaled detections back into the preview. Note that we swap height and width here. The reason is that the default orientation of the iPhone’s back camera is in landscape orientation where the width is the longer image dimension; thus, we swap them to use the app in portrait mode.
class ViewController: UIViewController {
   @IBOutlet weak private var previewView: UIView!
   private var previewLayer: AVCaptureVideoPreviewLayer! = nil
   var rootLayer: CALayer! = nil
   var bufferSize: CGSize = .zero

   override func viewDidLoad() {
       super.viewDidLoad()
       // Setting up the capturesession etc.
       //...

       // Define layer
       previewLayer = AVCaptureVideoPreviewLayer(session: session)

       // Add layer to hierarchy
       rootLayer = previewView.layer
       previewLayer.frame = rootLayer.bounds
       rootLayer.addSublayer(previewLayer)

       // Get dimensions of preview
       let dimensions = CMVideoFormatDescriptionGetDimensions((videoDevice?.activeFormat.formatDescription)!)
       bufferSize.width = CGFloat(dimensions.height)
       bufferSize.height = CGFloat(dimensions.width)
   }
}
For more information and detailed explanations on how to use the camera for video preview see for example this tutorial.
We now have our first output, the live preview of our AVCaptureSession, working, see figure 2. Let’s see how to configure the second output to provide frames for the model.
Second output: Pixel buffer
To provide an input for the model, we configure a second output for the capture session. This output writes frames as pixels into a buffer we call pixel buffer.
We must subclass the AVCaptureVideoDataOutputSampleBufferDelegate here, since this delegate will handle the frames.
class ViewController: AVCaptureVideoDataOutputSampleBufferDelegate {
   private let videoDataOutput = AVCaptureVideoDataOutput()
   private let videoDataOutputQueue = DispatchQueue(label: "VideoDataOutput", qos: .userInitiated, attributes: [], autoreleaseFrequency: .workItem)

   override func viewDidLoad() {
       //...
       session.addOutput(videoDataOutput)
       videoDataOutput.videoSettings = [kCVPixelBufferPixelFormatTypeKey as String: Int(kCVPixelFormatType_420YpCbCr8BiPlanarFullRange)]
       // Set raw pixel output for detector
       videoDataOutput.setSampleBufferDelegate(self, queue: videoDataOutputQueue)
       let captureConnection = videoDataOutput.connection(with: .video)
    }
}
One important thing to remember here is that, as mentioned above, the default orientation of the iPhone’s back camera is in landscape mode. Consequently, the frames we provide here for the model are not in portrait mode, but the model expects them as such. To account for that we will rotate the frame when we grab it from the pixel buffer.
With this, we have configured two outputs. We have a live preview, which can be shown on the phone’s screen, and have the frames stored in a buffer, which can be accessed by the model to perform detection on them. Next we will see how to do just that.
ViewController Detection: Detect and visualize
In this second class, which inherits from ViewController, we perform detections with the model on the frames which we take from the pixel buffer and visualize the results in layers. Finally, we project the layers with the visualization into the live preview from the previous section.
Read frames from pixel buffer
To read a frame from the buffer we use the VNImageRequestHandler. As mentioned earlier, the frames in the buffer are in landscape orientation. Since our app operates in portrait mode, we have to rotate the image to the .right here before we pass it to the model.
override func captureOutput(_ output: AVCaptureOutput, didOutput sampleBuffer: CMSampleBuffer, from connection: AVCaptureConnection) {
    let pixelBuffer = CMSampleBufferGetImageBuffer(sampleBuffer)
    let imageRequestHandler = VNImageRequestHandler(cvPixelBuffer: pixelBuffer, orientation: .right, options: [:])
    // Perform detection
    imageRequestHandler.perform(self.requests)
}
Then we send the frame to the model with the call to the perform(self.requests), where self.requests is a VNRequest. In the next step, we will see how detections are performed on this frame.
Make predictions
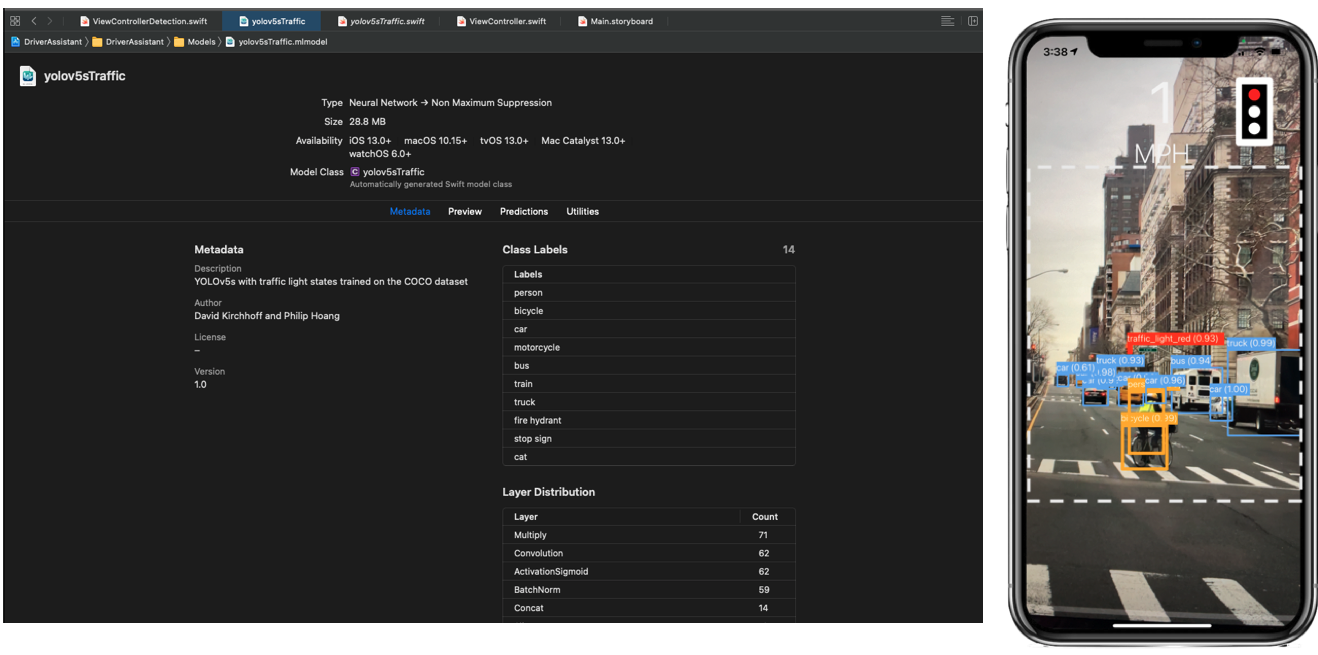
As you can see in the model view in figure 4, our model expects an image of size 640x640. The vision framework will scale down images that are larger and take a squared crop as default setting. You can easily try this by dragging an image into the preview section of the model view. Note that the crop on the right side of figure 4 does not appear to be square. This is because the image is slightly wider than what is shown on the display.
To use the model, we first load it into the variable visionModel with its URL.
let modelURL = Bundle.main.url(forResource: "yolov5sTraffic", withExtension: "mlmodelc")
let visionModel = try VNCoreMLModel(for: MLModel(contentsOf: modelURL))
The detection is then handled by VNCoreMLRequest. We use a dispatch queue to run the detection asynchronously on a separate thread.
class ViewControllerDetection: ViewController {
   private var detectionOverlay: CALayer! = nil
   private var requests = [VNRequest]()
   private var thresholdProvider = ThresholdProvider()

   func setupVision() -> NSError? {
       let error: NSError! = nil
       guard let modelURL = Bundle.main.url(forResource: "yolov5sTraffic", withExtension: "mlmodelc") else {
           return NSError(domain: "ViewControllerDetection", code: -1, userInfo: [NSLocalizedDescriptionKey: "Model file not found!"])
       }
       do {
           let visionModel = try VNCoreMLModel(for: MLModel(contentsOf: modelURL))
           let objectRecognition = VNCoreMLRequest(model: visionModel, completionHandler: { (request, error) in
               DispatchQueue.main.async(execute: {
                   if let results = request.results {
                       // Update thresholds
                       self.thresholdProvider.values = ["iouThreshold": MLFeatureValue(double: UserDefaults.standard.double(forKey: "iouThreshold")),
                                                         "confidenceThreshold": MLFeatureValue(double: UserDefaults.standard.double(forKey: "confidenceThreshold"))]
                        visionModel.featureProvider = self.thresholdProvider

                       self.drawVisionRequestResults(results)
                   }
               })
           })
           self.requests = [objectRecognition]
       } catch let error as NSError {
           print("Model loading failed: \(error)")
       }
       return error
   }
}
The VNCoreMLRequest returns an object which contains confidences, class labels and bounding box coordinates. We pass these to the method drawVisionRequestResults which is explained below.
Changing thresholds:
We provide the option to update the thresholds for IoU and confidence from the settings menu of the app. Updating the thresholds is implemented in the class ThresholdProvider which is called before the results are read. This class implements an MLFeatureProvider.
class ThresholdProvider: MLFeatureProvider {
   let iouThreshold = 0.6
   let confidenceThreshold = 0.4

   open var values = [
       "iouThreshold": MLFeatureValue(double: iouThreshold),
       "confidenceThreshold": MLFeatureValue(double: confidenceThreshold)
   ]

   var featureNames: Set<String> {
       return Set(values.keys)
   }

   func featureValue(for featureName: String) -> MLFeatureValue? {
       return values[featureName]
   }
}
Visualize detections
At this point we have predictions stored in the variable results as VNRecognizedObjectObservation. Next, we will see how we process them in the method drawVisionRequestResults to draw the bounding boxes and labels.
Since the function drawVisionRequestResults is called for each detection, we first want to remove any previous visualization by setting all sublayers of detectionOverlay to nil. Next, we read the label, confidence, and bounding box into variables.
func drawVisionRequestResults(_ results: [Any]) {
       detectionOverlay.sublayers = nil // Remove all old recognized objects

       for objectObservation in results where observation is VNRecognizedObjectObservation {
           // Select only the label with the highest confidence
           let topLabelObservation = objectObservation.labels[0]
           firstLabel = topLabelObservation.identifier
           firstConfidence = topLabelObservation.confidence
           let objectBounds = VNImageRectForNormalizedRect(objectObservation.boundingBox, Int(bufferSize.width), Int(bufferSize.height))

           // Draw box and place label
           let boxLayer = self.drawBoxes(objectBounds, label: firstLabel)
           detectionOverlay.addSublayer(boxLayer)
           let labelLayer = self.drawLabels(objectBounds, label: firstLabel, confidence: firstConfidence)
           detectionOverlay.addSublayer(labelLayer)
}
The bounding box coordinates stored in objectObservation.boundingBox are normalized in the range \([0,...,1]\). To project them into the live preview from the previous section we use the VNImageRectForNormalizedRect. To parameterize this transformation, we use the height and width of the previewLayer which we stored in the bufferSize variable in the class ViewController.
Finally, we draw the box and place the label by adding the layers boxLayer and labelLayer to detectionOverlay, see figure 3.
Draw bounding boxes
The box is drawn as a CAShapeLayer by specifying its centre point and a height and width, see left side of figure 5. These parameters are taken from the previously calculated values in objectBounds.
func drawBoxes(_ objectBounds: CGRect, label: String) -> CAShapeLayer {
    let boxLayer = CAShapeLayer()
    boxLayer.bounds = objectBounds
    boxLayer.position = CGPoint(x: objectBounds.midX, y: objectBounds.midY)
    boxLayer.borderColor = CGColor.init(red: 1.0, green: 0.0, blue: 0.0, alpha: 1.0)
    return boxLayer
}
Draw labels
To add the label text to the box we need a few more steps. After the label text is formatted we want to place a CATextLayer at the upper left corner of the bounding box, see figure 5 left. For reasons that become clear later we also have to mirror the label on the y-axis.
func drawLabels(_ bounds: CGRect, label: String, confidence: VNConfidence) -> CATextLayer {
    let textLayer = CATextLayer()

    // Format the string
    let font = UIFont.systemFont(ofSize: 30)
    var colour = Constants.TextColours.light

    // Place the labels
    textLayer.backgroundColor = CGColor.init(red: 1.0, green: 00, blue: 0.0, alpha: 1.0)
    let attribute = [NSAttributedString.Key.font: font, NSAttributedString.Key.foregroundColor: colour] as [NSAttributedString.Key : Any]
    let formattedString = NSMutableAttributedString(string: String(format: "\(label) (%.2f)", confidence), attributes: attribute)
    textLayer.string = formattedString
    let boxWidth: CGFloat = CGFloat(formattedString.length)
    textLayer.bounds = CGRect(x: 0, y: 0, width: boxWidth, height: 40.0)
    textLayer.position = CGPoint(x: bounds.minX+(boxWidth/2.0), y: bounds.maxY+18.0)
    textLayer.foregroundColor = CGColor.init(red: 0.0, green: 00, blue: 1.0, alpha: 1.0)
    textLayer.setAffineTransform(CGAffineTransform(rotationAngle: CGFloat(0)).scaledBy(x: 1.0, y: -1.0))
    return textLayer
}
Add detectionOverlay to rootLayer
At this point we can make predictions on the frames from the pixel buffer and have all the components ready to visualize them. To overlay them with the live preview we set the size of the detectionOverlay equal to that of the rootLayer and get the layer hierarchy from figure 3.
func setupLayers() {
    detectionOverlay = CALayer()
    detectionOverlay.bounds = CGRect(x: 0.0, y: 0.0, width: bufferSize.width, height: bufferSize.height)
    detectionOverlay.position = CGPoint(x: rootLayer.bounds.midX, y: rootLayer.bounds.midY)
    rootLayer.addSublayer(detectionOverlay)
}
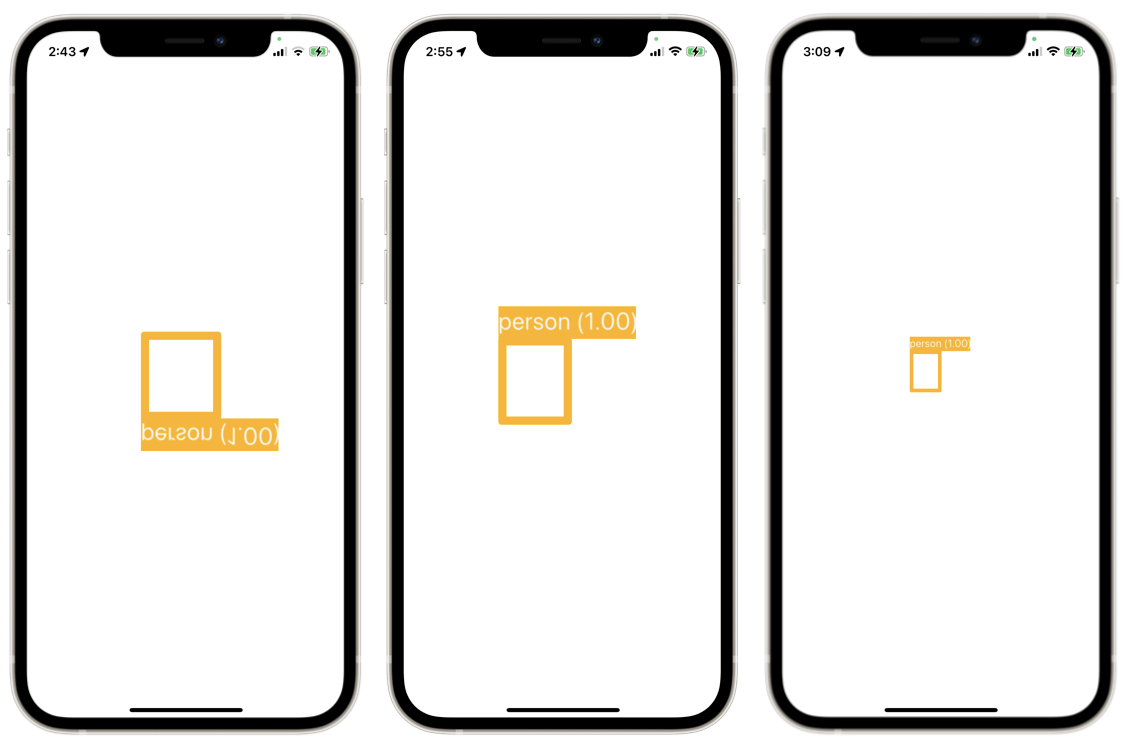
When we now run the model we get a box and a label as on the left side of figure 6. Unfortunately, as already hinted at in figure 5, the result looks strange. The reason is that the y-axis of the view and of the model are different. Additionally, when we shift the camera the box moves at a false rate. To properly project the detection into the live view we have to rotate and scale the detection layers.
Project detections into previewLayer
These two final transformations are packed into the method updateLayerGeometry.
Firstly, we rotate the image around the x-axis with the line
detectionOverlay.setAffineTransform(CGAffineTransform(rotationAngle: CGFloat(0.0)).scaledBy(x: 1.0, y: -1.0))
which results in the second image of figure 6. The visualizations look as expected now and shifting the camera also shifts them in the correct direction.
Lastly, we need to correct the rate at which the box is shifted. This is necessary since the rootLayer and detectionOverlay layer currently have different dimensions. The detectionOverlay has the dimensions 1080x1920 while the rootLayer has the dimensions 390x844 as seen earlier. We calculate a scaling factor to account for that. Finally, we centre the layer. The result can be seen on the right of figure 6. From the smaller size we see that the scaling worked as expected. We also confirm that the box shifts at the correct rate.
func updateLayerGeometry() {
    let bounds = rootLayer.bounds
    var scale: CGFloat

    let xScale: CGFloat = bounds.size.width / bufferSize.width
    let yScale: CGFloat = bounds.size.height / bufferSize.height

    // Rotate the layer into screen orientation and scale it
    detectionOverlay.setAffineTransform(CGAffineTransform(rotationAngle: CGFloat(0.0)).scaledBy(x: scale, y: -scale))
    // Centre layer
    detectionOverlay.position = CGPoint(x: bounds.midX, y: bounds.midY)
    CATransaction.commit()
}
Conclusion
To successfully deploy a PyTorch model on an iPhone with CoreML we have to provide frames for the model and arrange views and layers. While the documentation and available tutorials on how to read from the camera and show a live preview are great, there is little guidance on how to use a CoreML model properly. The tricky part here is to display the bounding boxes along with the live preview from the camera. This requires some transformations and placement of different views and layers. I hope that this post and the code of the app shed some light on this.